Region
Upper Extremity
Shoulder
Imaging the Shoulder
Patients are usually positioned for radiographs according to standard protocols that optimize detection of pathology. The standardization of views facilitates the differentiation of normal versus abnormal patterns. In the case of radiographs of the shoulder, the standard views are:


Two AP shoulder films are taken to improve visibility of components of the head of the humerus (the greater and lesser tubercles). The Y-view is used to evaluate traumatic dislocation. Axillary views, though less frequently needed, may be required to diagnose shoulder dislocations, which can appear normal on AP films. Also shown in this module is an image demonstrating the acromioclavicular joints (i.e. the acromioclavicular view). This type of film is often used to evaluate shoulder separation.
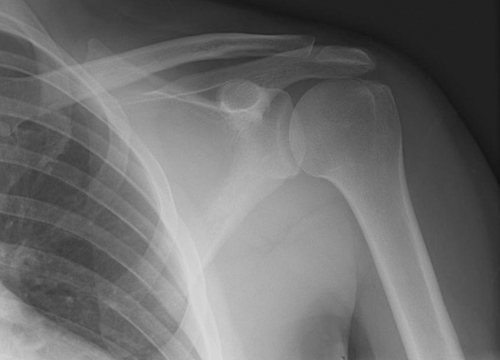
AP Shoulder, external rotation
This view is taken with the patient in anatomical position (i.e. arm in external rotation).
Identify the following structures:
- Clavicle
- Acromion
- Acromioclavicular Joint
- Head Of Humerus
- Greater Tubercle
- Lesser Tubercle
- Glenoid Cavity
- Superior Border Of Scapula
- Medial Border Of Scapula
- Lateral Border Of Scapula
- Coracoid Process
AP shoulder, internal rotation
This view is taken with the arm internally rotated to demonstrate the profile of the lesser tubercle. The greater tubercle is displaced anteriorly and cannot be seen well (compared to the previous view).
Identify the following structures:
- 1. Lesser Tubercle On Internally Rotated View (Compare With Above)
Y View of Shoulder (transthoracic)
The Y-view is taken by aligning the x-ray beams parallel to the plane of the scapula so that it can be seen "floating" over the thoracic wall. In a healthy patient, the humeral head should be in alignment with the glenoid cavity of the scapula. If the glenoid cavity is not visualized directly, its position may be inferred from the intersection of the spine of the scapula, coracoid process and scapular body (the "Y" formation). Following a traumatic dislocation, the humeral head will not be aligned with the "Y".
Identify the following structures:
- Clavicle
- Acromion
- Spine Of Scapula
- Coracoid Process
- Body Of Scapula
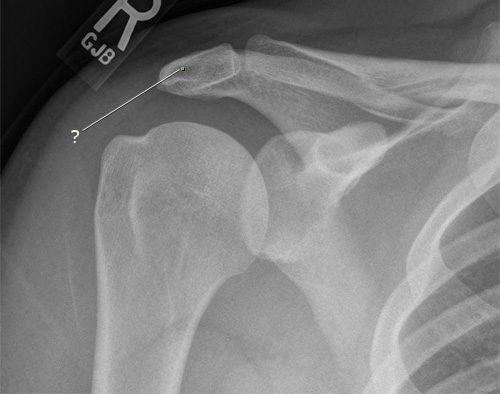
Axillary view of shoulder
The axillary view is useful for detecting anterior or posterior shoulder dislocations that are not evident in the AP view. The x-ray beam is directed into the axilla from below (inferior to superior), or down through the axilla from above the shoulder (superior to inferior). Notice in this image how you can evaluate the alignment of the humeral head with the glenoid cavity (in this film they are aligned - there is no dislocation).
Identify the following structures:
- Clavicle
- Acromion
- Glenoid Cavity
- Coracoid Process
Acromioclavicular joints
The patient stands in the anatomical position and an AP film is taken that includes both acromioclavicular joints in the same image. This allows comparison of the two joints. Occasionally, a second film is taken while the patient holds weights in both arms. This is the "stress view" that helps elucidate acromioclavicular joint separation by increasing the load that the joint has to bear. If there is ligamentous injury, the joint space will widen.
The two spaces requiring careful evaluation are the acromioclavicular joint space and the coracoclavicular space. These should be symmetric on the right and left and should not be abnormally widened. Increased distances across the spaces indicate a degree of joint separation or sprain. The film here was taken of a college football player who suffered an AC separation on the right side. Note the widening compared to the left side.

MRI: Axial Shoulder Arthrogram
This image is a T1-weighted MRI with contrast injected into the joint space of the right shoulder (arthrogram). The contrast material appears bright white. Fat usually appears bright in a T1-weighted image; however, a technique called 'fat saturation' has been employed in this image to make the fat in the tissues and bone marrow dark in order not to detract from the brightness seen in the joint space.
Identify the following structures:
- Deltoid
- Head Of Humerus
- Glenoid Cavity
- Glenoid Labrum
- Coracoid Process
- Spine Of Scapula
- Infraspinatus
- Long Head Of Biceps Brachii Tendon
- Clavicle

MRI: Coronal shoulder arthrogram
This MRI represents a similar protocol to the axial series with contrast in the joint space and fat saturation, but shows a coronal image of the right shoulder.
Identify the following structures:
- Head Of Humerus
- Deltoid
- Supraspinatus
- Synovial Joint Cavity

Shoulder Questions
Radiology Quiz
Quiz
Is the shoulder in this image externally or internally rotated?

Externally
Internally
Osteology Quiz
Quiz
Identify the labeled structure.

Acromion
Coracoid Process
Spine of the Scapula
Superior Angle of the Scapula
Infraspinatus Fossa
Anatomy Quiz
Quiz
In this anterior view of the right shoulder, identify the labeled structure.

Supraspinatus
Deltoid
Teres Major
Teres Minor
Biceps Brachii
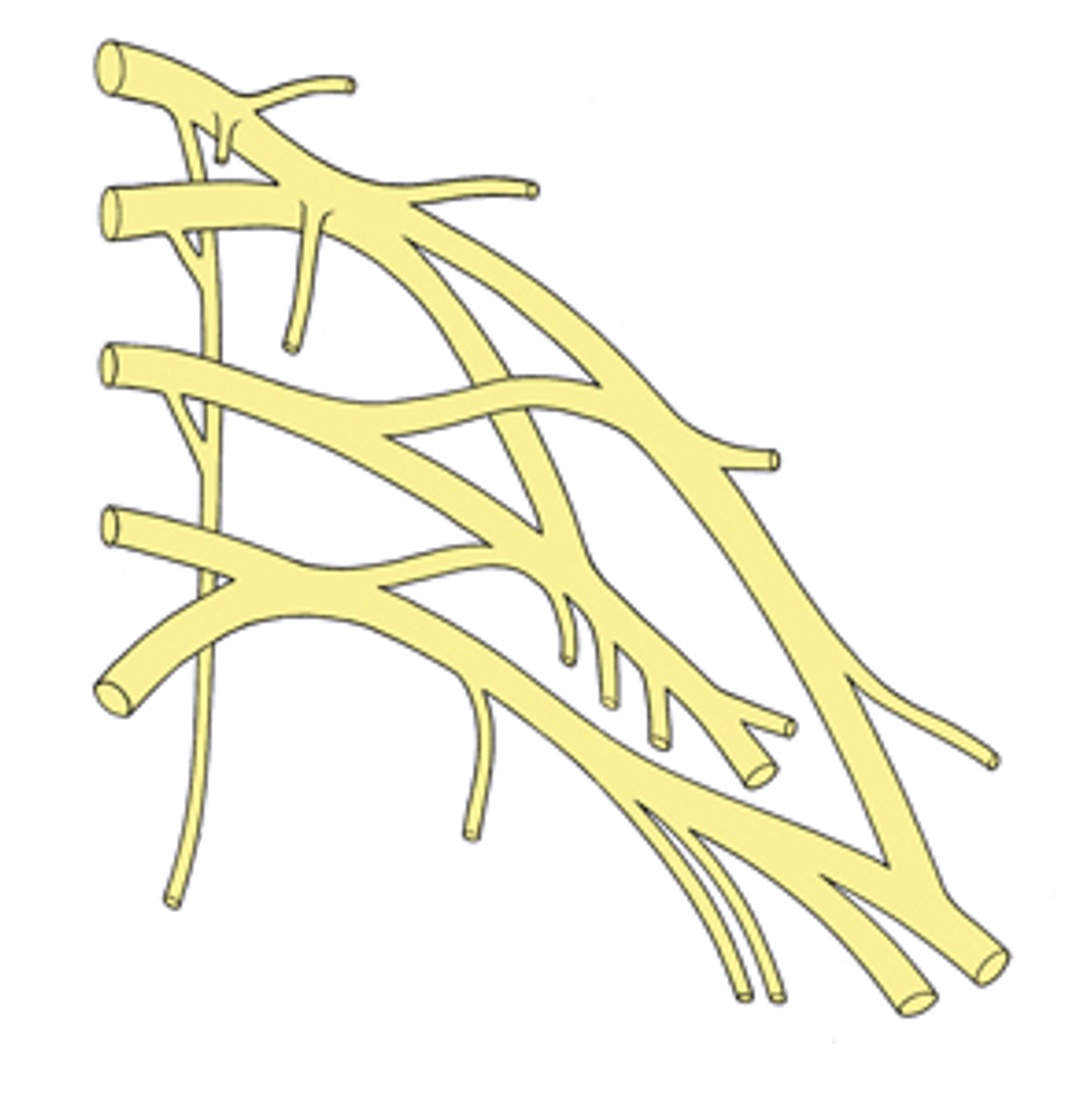
Axilla & Brachial Plexus
Identify the roots, trunks, divisions, and cords on this diagram of the brachial plexus
Identify the following structures:
- C5
- C6
- C7
- C8
- T1
- Superior Trunk
- Middle Trunk
- Inferior Trunk
- Anterior Divisions
- Posterior Divisions
- Lateral Cord
- Posterior Cord
- Medial Cord
Axilla & Brachial Plexus Questions
Anatomy Quiz
Quiz
The anterior axillary fold is formed by:
deltoid
latissimus dorsi
pectoralis major
serratus anterior
subscapularis
Arm & Elbow
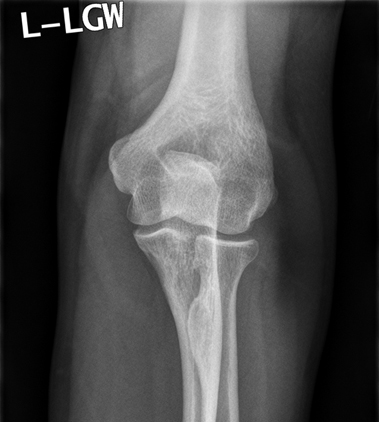
Anteroposterior (AP) elbow
This view is taken with the patient in anatomical position.
Identify the following structures:
- Humerus
- Radius
- Ulna
Lateral Elbow
The lateral view is taken with the elbow flexed 90 degrees.
Identify the following structures:
- Humerus
- Radius
- Ulna

Elbow Dissection
Arm & Elbow Practice Questions
Radiology Quiz
Quiz
Identify the labeled structure.

Olecranon Process
Coronoid Process
Head of the Radius
Neck of the Radius
Radial Tuberosity
Osteology Quiz
Quiz
Identify the labeled structure.

Medial Epicondyle
Lateral Epicondyle
Trochlea
Capitulum
Anatomy Quiz
Quiz
A weight-lifter has increased the frequency of his training to prepare for an upcoming competition. Recently he noticed a loss of sensation over the lateral side of his forearm, and his ability to supinate is weaker than normal. Which of the following could account for his symptoms?
damage to the medial cord of the brachial plexus
impingement of the radial nerve
partial tearing of the brachialis tendon
hypertrophy of the coracobrachialis muscle
Forearm
Forearm Radiology
Identify the following structures:
- Humerus
- Radius
- Ulna

Distal forearm
This radiograph shows the distal part of the forearm and the carpal bones. There is a fracture in the radius - can you find it?
Identify the following structures:
- Radial Styloid Process
- Ulnar Styloid Process
- Scaphoid
- Lunate
- Triquetrum
- Pisiform
- Trapezium
- Trapezoid
- Capitate
- Hamate
- Fracture In The Radius

Forearm Practice Questions
Radiology Quiz
Quiz
Identify the labeled structure.

Humerus
Radius
Ulna
Osteology Quize
Quiz
Identify this bone.

humerus
radius
ulna
fibula
tibia
Anatomy Quiz
Quiz
In this anterior view of the distal part of the forearm, identify the labeled structure.

Supinator
Pronator teres
Pronator quadratus
Extensor pollicis longus
Extensor pollicis brevis
Hand & Wrist
Imaging the Wrist and Hand
Patients are positioned for wrist and hand radiographs according to standardized protocols, so that normal patterns can be discerned and abnormalities can be readily identified.
The three standard views of the wrist and hand are:

Supplemental views include:
- PA with the wrist in ulnar deviation - for closer examination of the scaphoid
- Anteroposterior view with the hand in 45° oblique position (also called the ball catcher view) - useful in early arthritis
It is extremely important to remember that multiple views of a given area may be required to figure out what the actual three-dimensional relationships are.
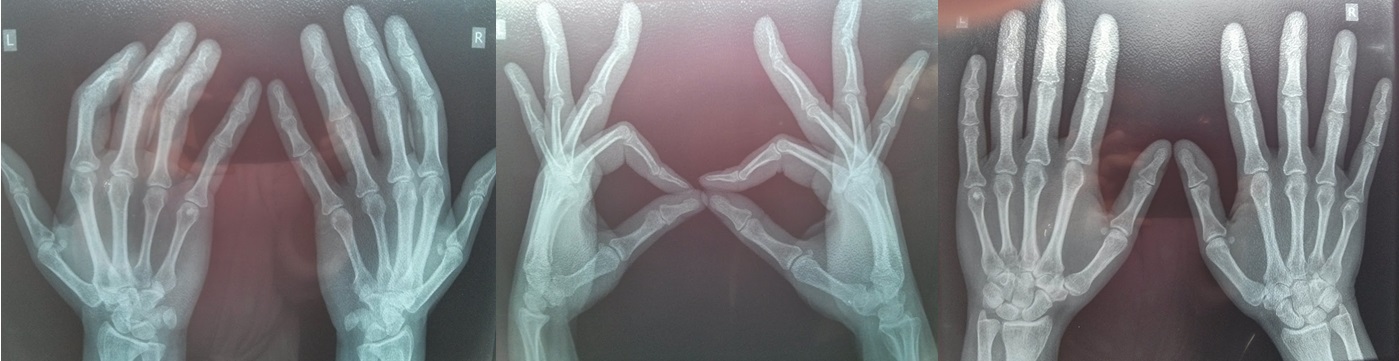
PA Hand
The PA (posteroanterior) view is obtained in any radiologic examination of the hand and wrist. Since the human thumb is "rotated" 90° with respect to the fingers, this radiograph gives an oblique view of the thumb, but a PA view of all other structures.
Identify the following structures:
- Styloid Process (Radius)
- Styloid Process (Ulna)
- Scaphoid
- Lunate
- Triquetrum
- Pisiform
- Trapezium
- Trapezoid
- Capitate
- Hook Of Hamate
- Metacarpals
- Phalanges
- Sesamoid Bone
PA Oblique Hand
In the PA oblique view, the patient holds the hand at about 45° with respect to the cassette, and fans the fingers so that they are well separated in the final radiograph.
In both the PA and PA oblique views, the scaphoid bone is not well isolated from the other carpal bones; it is superimposed on them. Scaphoid fractures are fairly common, so if there is concern about a possible scaphoid fracture, a different view is needed. What wrist position would move the carpal bones away from the scaphoid? (answer will be revealed soon...)
Identify the following structures:
- Scaphoid
- Trapezium
- Sesamoid Bone

Lateral Hand
This is the third of the standard views of the wrist and hand. You can see that it is difficult to discern the individual carpal bones, however this view might be necessary to rule out a possible fracture.

Scaphoid

This is a radiograph of the wrist with the hand in ulnar deviation (adduction). This "opens up" the scaphoid bone and decreases the amount of overlap with adjacent carpal bones. This view is very useful in evaluating for scaphoid bone fractures.
Boxer's Fracture
A boxer's fracture typically involves the neck of the 5th metacarpal bone. In addition to any deformity seen from the angulation of the fracture, loss of the prominence of this "knuckle" when making a fist may be seen with this fracture.


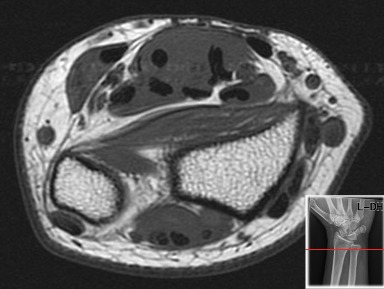
MRI Axial Wrist
The following labled images show T2-weighted axial MRIs of the wrist. Image 1 is the most proximal and image 3 the most distal. The first image was taken at the distal forearm. Remember that by convention, cross sectional images are viewed as though you were standing at the foot of a supine patient, looking up towards their head. The top of the image is anterior and the bottom, posterior.
Connective tissue elements, such as tendons and ligaments will appear black in these images.
Identify the following structures:
- Radius
- Ulna
- Pronator Quadratus
- Flexor Digitorum Superficialis
- Flexor Digitorum Profundus
- Flexor Pollicis Longus
MRI: Coronal Wrist
This MRI sequence was obtained in the coronal plane, and demonstrates detail of the carpal bones.
Identify the following structures:
- Ulna
- Radius
- Scaphoid
- Lunate
- Triquetrum
- Trapezium
- Trapezoid
- Capitate
- Hamate

Hand & Wrist Dissection
Hand & Wrist Practice Questions
Radiology Quiz
Quiz
Identify the labeled structure.

lunate
capitate
hamate
scaphoid
trapezium
Osteology Quiz
Quiz
Identify the labeled structure.

Capitate
Lunate
Hamate
Triquetrum
Trapezoid
Anatomy Quiz
Quiz
Identify the labeled structure.

adductor pollicis
opponens pollicis
abductor pollicis brevis
abductor pollicis longus
flexor pollicis brevis
flexor pollicis longus
Upper Extremity Angiography
Aortic Arch and Subclavian Angiogram
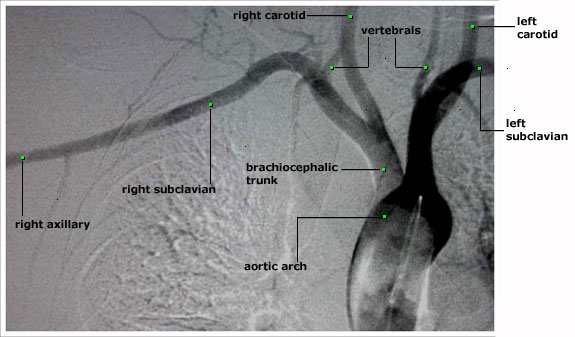
The x-ray dye is injected through a catheter which is located in the aortic arch. Any evaluation of the upper extremity arteries must include an evaluation of the aortic arch and the brachiocephalic trunk. The aortic arch can be seen, with its three branches: the brachiocephalic trunk, the left common carotid and the left subclavian arteries. The brachiocephalic trunk divides into the right common carotid and the right subclavian arteries. The subclavian artery give off several branches, including the vertebral arteries. The subclavian artery becomes the axillary artery at the lateral border of the first rib.
Axillary and Brachial Angiogram
These are two images of the axillary and brachial arteries. The image on the left is taken earlier, and that on the right, later. The contrast was injected via a catheter which was placed into the subclavian artery/axillary artery junction. Notice that on the later image, the axillary artery isn't as visible, as unopacified blood flows into the axillary artery and mixes with and dilutes the x-ray dye.


Radial and Ulnar Angiograms
This is an angiogram of the arteries of the forearm. The contrast was injected via a catheter in the axillary artery/subclavian artery junction. The bolus of contrast is observed under flouroscopy and sequential images of the arm are taken to see the various arteries of the arm. Note that the common, anterior and posterior interosseous arteries are not visualized. They are either not present or are diminutive. Normal arterial anatomic variants such as this exist.

Arteries of the Hand

This image was taken when the bolus of contrast had reached the arteries in the hand. There are many anatomic variants in the arterial supply of the hand. In this patient, the deep palmar arch, which is predominantly formed and supplied by the radial artery, is well seen. The superficial palmar arch, which is predominantly formed and supplied by the ulnar artery, is absent. This is a normal variant.